What you need before you begin:
- Download the tool (linked above)
- On your SCCM server set your PowerShell execution policy to Unrestricted.
- Set-ExecutionPolicy Unrestricted
- In Active Directory identify the Schema Master server
- In Active Directory create a service account called SCCMAdmin. This needs to be a SysAdmin on your SQL server and a Local Admin on all SCCM servers
- In Active Directory create a security group called SCCM Site Servers and add all the SCCM servers and the SCCM Admin account to this group
When you first run the tool it does a validation check to see if reboots are required, you are on a supported server, you have a supported version of PowerShell and the account you are using is a local administrator on this machine. You will also notice the current supported SCCM versions in the lower left.

Since we have Green Check marks across the board, lets begin!
System Management Container:
If you click on the Other tab at the top and Select System Management Container. Check the box Create the System Management container and select Search.

Enter in the name of the security group created above and Click Search. Once it is found select it in the window below and Click OK. If you are not a member of Domain Admins you will not be able to add the selected group when you search.

This will go out to ADSI, create the Systems Management Container. It will then go to AD and add the security group defined above and set delegation permissions for it.

Extend Active Directory Schema:
Now click on the Extend Active Directory Schema radio button. You will be asked for the name of the Schema Master server name. Once you enter it in Click Extend. If you are not a member of Schema Admins you will get an error at this point.

You will be prompted for the location of the SMSSETUP\BIN\X64 folder so it can locate the extadsch.exe file to execute the AD Schema extension.

Verify that it was successful

Windows ADK:
Next we will install the Windows Assessment and Deployment Kit. Select the Install Windows ADK radio button. You will see that you have two installation Methods available to you, Offline and Online. If you have already downloaded the ADK you can do an offline install, otherwise select Online. You can also install either ADK 8.1 or ADK 10. Since we are going to install SCCM 1511, ADK 10 is required. Click Install

Verify it was successful

Install WSUS:
Now select the Install WSUS radio button. Since I already have SQL 2014 SP1 installed I am going to leverage that for the WSUS install. You can also use the Windows Internal Database if you choose. After filling in the appropriate information Click Install

You will be prompted for a save location for the WSUS Content. I created a new folder on c:\ called WSUS Content and Clicked OK

Note - This is obviously not an ideal configuration. In a production environment you would not want this on the c:\ but since this is just a lab it didn't matter
All good!

Note - Since we are also going to be supporting Windows 10 in this lab you will need to download and install KB3095113 which provides WSUS support for Windows 10 feature upgrades.
Primary Site Prerequisite Installs:
We are going to be building a Primary site so Click on the Primary Site Tab. Be sure to Check the box Download prerequisite files and Click Install

You will be prompted for a save location for the downloads after all the roles and features are installed. I created a new folder c:\downloads

Then you will also be prompted for the \SMSSETUP\BIN\X64 folder so it can verify version information for the download

A lot better than doing it the hard way!

SCCM Install:
Now that the server is prepped (and in record time), we are ready to run the SCCM install. If you are not logged in as the SCCMAdmin account do so now. Double Click on splash.hta. Make sure you have Version 1511. Click Install

Click Next

Select Install a Configuration Manager primary site and Click Next

Click Next

Select Install a Configuration Manager primary site and Click Next

Enter your license key and Click Next

Accept the EULA and Click Next

I am still surprised this has not been changed. Accept all three (even though we wont be using SQL Server Express). Click Next

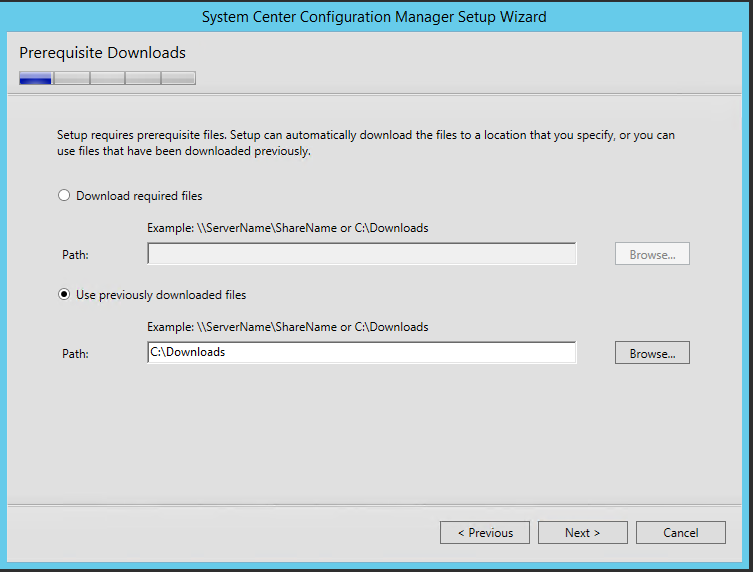
The install will verify that all files needed are present

Select all appropriate server languages and Click Next

Select all appropriate client languages and Click Next

Enter a site code and site name. You can also modify the install location. Click Next

This is going to be a new stand alone primary so select Install the primary site as a stand-alone site and Click Next

Nice feature added in 2012 R2. You can add additional members of the hierarchy at a later time if you need to. Select Yes

Verify your SQL installation information and Click Next

You can modify the file locations if your SQL procedures dictate. Click Next

Since we only have the one Primary, Click Next

Choose Configure the communication method on each site system role and Click Next

We want this server to be a Management Point and a Distribution Point so Click Next

Click Next

This is a great new feature which I will cover in a subsequent segment. Select Yes, let's get connected and Click Next

Review your install summary and Click Next

I had to change the SQL Server Service to Network Service or Local System to resolve the failure. Click Run Check

These warnings can be ignored. Click Begin Install

Eighteen minutes later (more or less) and we are all done! Click Close and Exit from the installer

From here you can open the console and begin using SCCM 1511!
More to come!
If you like this blog, give it a g+1
No comments:
Post a Comment